Remote Viewing
Calving Camera Over The Internet
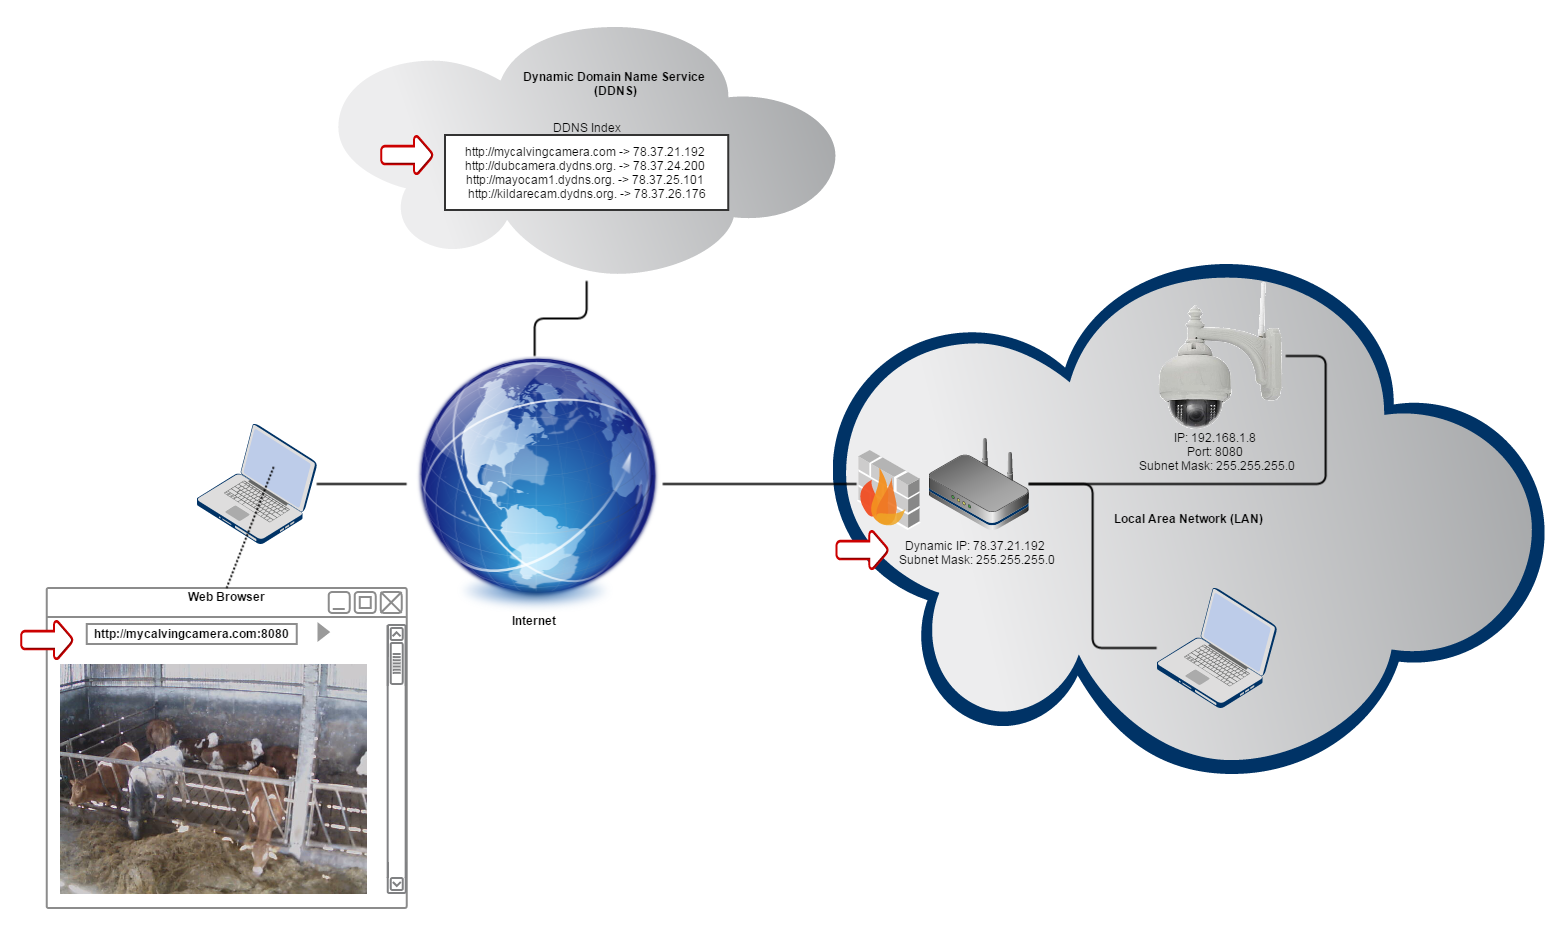
This article describes how to connect and configure a calving camera system up to the Internet. There are two main ways to accomplish this; a static IP address, from your ISP, or with a DDNS. This article will describe in detail how to setup and configure both of these options. The system being described in this article is an IP camera system but a lot of the information is useful for connecting a CCTV camera system up to the Internet.
Static IP Address
The first option is to get a static IP address of your Internet Service Provider (ISP). Usually by default your ISP will assign a dynamic IP address to your Internet connection that can change from time to time. When your modem is started up it requests an IP address from the ISP. The ISP will return an IP address which will be set on the modem. This address will be used to communicate with other computers on the Internet. After following restarts a different IP may be given from the ISP.
To get a static IP address ring up your ISP and request one. There will be a charge for this which could be around 20 to 30 euros per year. Depending on your ISP it could be different. Once you get your static IP address you will need to set this on your modem. Check the user manual of your modem to see how to set this up.
Here’s how to set this on an Eircom D1000 Modem:
- Go to Network Settings page
- Click Broadband tab
- Find Internet Connection section
- Look for IP Address label
- Enter Static IP Address provided by your ISP
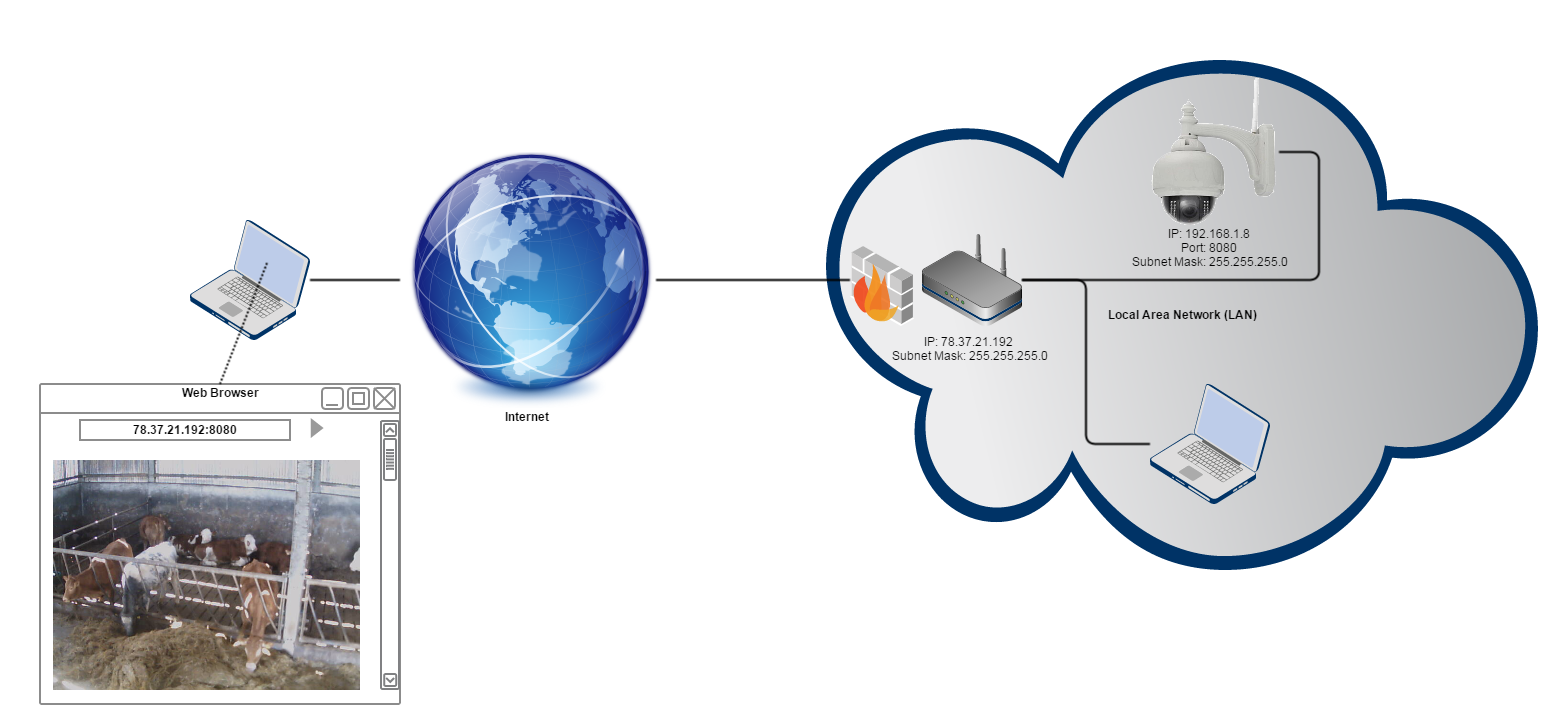
Once this is set up you will be able to connect to your modem from anywhere in the world. Simply type the IP address into a Web Browser. This should display the login page of your Modem.
Next, set a static IP address on the IP camera that is unique from within the Local Area Network (LAN). This is to make sure that the cameras IP does not change. This is not to be confused with the static IP address that was provided by the ISP. All network devices from within your LAN can be configured with a static IP address that you control. Also, make sure you set the same Subnet Mask that is set on your modem.
For example, this is an example IP camera settings:
- IP Address: 192.168.1.8
- Subnet Mask: 255.255.255.0
- Port: 8080
Port Forwarding
The next step is to allow the IP camera to be accessed through the modem. The modem will need to be configured to open the port that the camera is running on. Traffic connecting to that port is forwarded on to the camera. This process is called Port Forwarding.
Here are the usual ways to set this but your modem may differ:
- Go to Network Address Translation (NAT) page
- Open Port Forwarding tab
- Click Add New Rule button
- Enter the IP address of the camera and the port number.
You should now be able to connect to your camera by entering the static IP address followed by the port number: <static ip>:<port>. For example, if your IP address is 78.37.21.192 and the camera is running on port 8080 then enter 78.37.21.192:8080 into a Web Browser. This should display the camera console web page. From there you can view the video from the camera.
If there is an issue at this point, for example if it doesn’t display anything then it could be blocked by the Firewall on the Modem. You might need to open the port on the firewall to let traffic through.
DDNS
The second option to connecting a calving camera system up to the Internet is to use a Dynamic Domain Name Service (DDNS or DynDNS). This service works by assigning a domain name to the IP address of your local network. The DDNS will then forward all requests make to this domain name to the IP address.
Domain Names
A domain name is an easier name to remember than an IP address. An example of this is: http://mycamera.dydns.org. This can be typed directly in a browser. This will go to the DDNS which will forward the request to the IP address of the network.
Setting up a DDNS Account
There are many different companies on the Internet that provide DDNS services. One of them is DynDNS where you can set up an account. If you want a custom domain name, for example; http://myfarmcalvingcamera.com you will need to pay an extra small fee for this.
It’s very simple to set this up. Go to a DDNS provider and open an account. You will be able to create a domain name that will be easily remembered.
DDNS Client
As the IP address of the local network will change from time to time the DDNS will need to be told about it. A DDNS client will need to be running on the local network. This will inform the DDNS service of any changes so it can keep its domain name index up to date. This is a small software program that periodically polls the IP address assigned to the LAN. If it discovers that it has changed then it connects to the DDNS service and informs it of the new IP address. The DDNS service takes this new IP address and updates its domain name index. Now when someone enters your domain name into a browser the DDNS will forward this request to the correct IP address.
Modem with DDNS Client
Most modems have a DDNS client built in internally. This is very easy to setup. Go to device settings on the modem and look for DDNS settings. From there, you can enter the DDNS account information so it can access it to do the update. This will always be the best place to have a DDNS client running as the modem will be the first to know about IP address changes.
Camera with DDNS Client
Some IP cameras also contain a DDNS client. Go to device settings, in the cameras admin page, and look for DDNS settings. From there you can enter the DDNS account information so it can access it.
PC with DDNS Client
If neither the modem nor IP camera has a DDNS client built in a DDNS client can be installed on a PC. Your DDNS provider will have a DDNS client that can be downloaded. This will run the IP update. The only disadvantages to this are that the PC will need be running at all times to keep the DDNS updated.
With either of these two set up you will be able to connect and monitor your calving camera from anywhere in the world. You can use any laptop, PC or smart phone. All you need is an Internet connection. I hope you found this article useful. If you have any questions then feel free to contact us.